.jpg "Roasted Vegetables + Chickpeas with Lemon-Cannellini Sauce")
This recipe is adapted from one of the very first vegan meals I used to make on a regular basis when starting my new lifestyle. This was before I started blogging and then was off trying everything else I could. Nice to come back to this recipe once again. I have only slightly changed it from the original by adding chickpeas for boost of protein and texture, as well as mixing up the veggies a bit. The original recipe can be found here on One Green Planet by its author Robin Robertson. I love this recipe because of the versatility and ease. The vegetables can be pretty much anything you like. Use red or Yukon gold potatoes in place the sweet potato, just be sure to use about 2 cups worth. You can add, or sub in, butternut squash, pumpkin or any other winter squash you might like. You may like to add earthiness by using cubed beets. Try cauliflower florets in place of broccoli. Really anything goes here. As for the sauce, I find it's not something to write home about on its own but that changes once added like gravy to the top of your vegetables and grain, all the flavors come together and you'll be in comfort food heaven! This recipe is easy to pull together and makes for a great hearty meal in these cooler months. It's full of protein and fiber, is low in fat and has plenty of essential nutrients needed to maintain a healthy plant based diet!

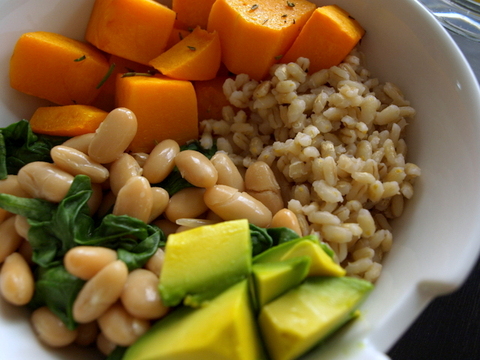
Clean, vibrant, healthy and satisfying!
By all means load your plate with two to three times the vegetables you see here. Enjoy freely!
By all means load your plate with two to three times the vegetables you see here. Enjoy freely!

Roasted Vegetables + Chickpeas with Lemon-Cannellini Sauce
Ingredients (serves 4-6)
- 1 large sweet potato, cut into 1 inch cubes
- 2 cups broccoli florets
- 2 large carrots, sliced
- 2 cups brussels sprouts, halved lengthwise
- 1 onion, sliced (use your favorite onion or what you have on hand)
- 1 can (15 oz.) garbanzo beans (chickpeas), drained and rinsed
- 1 tablespoon olive oil
- mineral salt & fresh cracked pepper or lemon-pepper, to taste
- 2 -3 cups cooked quinoa or grain of choice (about 1/2 cup per person)
- 2 cans (15 oz.) cannellini beans, drained and rinsed
- 1/4 cup nutritional yeast
- 1 teaspoon garlic powder
- 3/4 - 1 cup vegetable broth (start low and add as needed)
- juice of 1 good size lemon
- generous pinch of red pepper flakes
- mineral salt, to taste
- 1 tablespoon fresh chopped basil, thyme, parsley, chives, sage, tarragon
Preheat oven to 425 degrees F.
Line roasting pan/baking dish with silpat, parchment paper or grease lightly with neutral oil. Add vegetables to roasting pan and toss to coat with olive oil. Arrange vegetables in a single layer (as much as possible), sprinkle with salt and pepper to taste. Roast vegetables until tender and lightly browned, about 45 minutes, mixing once halfway through.
Start your grain of choice while vegetables are cooking. Quinoa will take about 30 minutes.
Prepare your sauce by placing all the ingredients into your food processor/blender, except for the herbs, and process until smooth. Add extra broth as needed to thin. Add in herbs and pulse once or twice. Place sauce in a small saucepan and heat over low heat, uncovered, until warm, stirring occasionally.
Serve vegetables over grain of choice with a nice helping of sauce over top. Serve warm.
Serves 4 generously.
Store leftovers in refrigerator for up to a week. Leftovers are just as delicious!
Enjoy!
This recipe is adapted from one of the very first vegan meals I used to make on a regular basis when starting my new lifestyle. This was before I started blogging and then was off trying everything else I could. Nice to come back to this recipe once again. I have only slightly changed it from the original by adding chickpeas for boost of protein and texture, as well as mixing up the veggies a bit. The original recipe can be found here on One Green Planet by its author Robin Robertson. I love this recipe because of the versatility and ease. The vegetables can be pretty much anything you like. Use red or Yukon gold potatoes in place the sweet potato, just be sure to use about 2 cups worth. You can add, or sub in, butternut squash, pumpkin or any other winter squash you might like. You may like to add earthiness by using cubed beets. Try cauliflower florets in place of broccoli. Really anything goes here. As for the sauce, I find it's not something to write home about on its own but that changes once added like gravy to the top of your vegetables and grain, all the flavors come together and you'll be in comfort food heaven! This recipe is easy to pull together and makes for a great hearty meal in these cooler months. It's full of protein and fiber, is low in fat and has plenty of essential nutrients needed to maintain a healthy plant based diet!
Clean, vibrant, healthy and satisfying!
By all means load your plate with two to three times the vegetables you see here. Enjoy freely!
By all means load your plate with two to three times the vegetables you see here. Enjoy freely!
Roasted Vegetables + Chickpeas with Lemon-Cannellini Sauce
Ingredients (serves 4-6)
- 1 large sweet potato, cut into 1 inch cubes
- 2 cups broccoli florets
- 2 large carrots, sliced
- 2 cups brussels sprouts, halved lengthwise
- 1 onion, sliced (use your favorite onion or what you have on hand)
- 1 can (15 oz.) garbanzo beans (chickpeas), drained and rinsed
- 1 tablespoon olive oil
- mineral salt & fresh cracked pepper or lemon-pepper, to taste
- 2 -3 cups cooked quinoa or grain of choice (about 1/2 cup per person)
- 2 cans (15 oz.) cannellini beans, drained and rinsed
- 1/4 cup nutritional yeast
- 1 teaspoon garlic powder
- 3/4 - 1 cup vegetable broth (start low and add as needed)
- juice of 1 good size lemon
- generous pinch of red pepper flakes
- mineral salt, to taste
- 1 tablespoon fresh chopped basil, thyme, parsley, chives, sage, tarragon
Preheat oven to 425 degrees F.
Line roasting pan/baking dish with silpat, parchment paper or grease lightly with neutral oil. Add vegetables to roasting pan and toss to coat with olive oil. Arrange vegetables in a single layer (as much as possible), sprinkle with salt and pepper to taste. Roast vegetables until tender and lightly browned, about 45 minutes, mixing once halfway through.
Start your grain of choice while vegetables are cooking. Quinoa will take about 30 minutes.
Prepare your sauce by placing all the ingredients into your food processor/blender, except for the herbs, and process until smooth. Add extra broth as needed to thin. Add in herbs and pulse once or twice. Place sauce in a small saucepan and heat over low heat, uncovered, until warm, stirring occasionally.
Serve vegetables over grain of choice with a nice helping of sauce over top. Serve warm.
Serves 4 generously.
Store leftovers in refrigerator for up to a week. Leftovers are just as delicious!
Enjoy!
.jpg "Pan Bagnat (White Bean Niçoise Salad Sandwich)")
.jpg "Use a French baguette, ciabatta loaf or boule to house your sandwich...even good sized rolls would be great too!")
+(1).jpg "Roughly mashed beans with dressing....I've used cannellini beans and chickpeas here")
+(5).jpg "Some of the other ingredients that go into this classic provençal sandwich...")
.jpg "A tasty veganized version of a classic...")
.jpg "Assemble your sandwich...")
.jpg "Wrap your sandwich in saran wrap and press...")
.jpg "Done pressing and ready to eat!")


.jpg "Stuffed Acorn Squash + Wild Rice Medley")
.jpg "Slice, remove seeds, prep and cook your acorn squash...")
.jpg "Cook your vegetable medley...")
.jpg "Add in your cooked wild rice mix...")
.jpg "Fill your squash halves with the wild rice medley...")
.jpg)